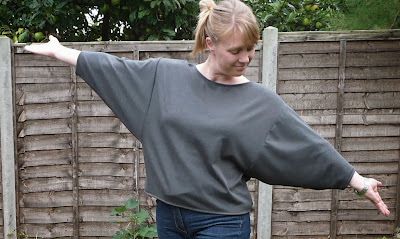
I really wasn't sure me or my 45 year old Bernina would be up to it; but due to really wanting to join in with Stephanie from Starcross Sewing's inspired "A Year in Indie patterns" sew along, there was no stoping me.
Think I need to learn to look slightly less smug at my dizzying sewing prowess.... and move onto the pattern...
Brand: Named Patterns
Pattern: Blair Batwing Shirt
I hadn't heard of this company before, but was really impressed with the style.
I'm really new to sewing (clothes, anyway) so I chose the above as I love this comfy batwing style of sleeves; and was hopeful that it was within my ability to achieve the finished item within a short amount of time.
The pattern has the immediacy of being a PDF, which I personally like.
They have the different pieces overlaying one another, which meant that the pattern must be traced out. As I like to trace patterns this also was not a problem for me, although I can understand how it might not suit everyone.
One definite bonus of course was that it is less printed paper.
9 sheets only, extra muddy cat paw-prints not included in the price I'm afraid.
I found the pre-sewing (preparation) instructions clear and useful. They included all I needed to know to prep for the sewing; choosing the correct size and planning it out.
When it came to the actual sewing instructions though, they were less clear for a beginner. This was due to not having any depictions of the steps, and it tended to be worded like I should understand how patterns normally come together.
(With a more complicated piece if the instructions were in a similar vein, I could certainly imagine someone like me struggling a little.)
It had me a little confused for a while; this was step 2 of the instructions....
"2. Sew the shoulder seams so that you include a Framilon band in them. The Framilon band will prevent the shoulder seam from stretching in use. If you don’t have Framilon, you can replace it with a thin strip of the bodice fabric cut lengthways."
But that was it.
First I googled framlion, which turns out to be that weird rubbery stuff that is used to stabilise seams. All good and something new learned.
But then I had to strike out on my own, cut a strip, and crossed my fingers that I sort of got the idea.
Now it may well be that anyone who might read this may think I'm a little pedantic with my want of descriptions. And I probably am.
This is only my 3rd make, coming after a Mathilda Blouse, and an Anna Dress. Both those patterns hold your hand every single baby step of the way, so perhaps I've been spoiled.
But as this is listed as 'Very simple" I would humbly suggest that the instructions might be expanded to match the sewing level?
Anyhoo,
I practiced with my machine to find a suitable stitch as mine only does Straight, or zig-zag, thats it.
I hear that zig-zag is the most recommended in this situation but in the end I went with a straight one, and instead stretched out the material.
I have no idea if this was a good choice or not, but it seemed to do the job.
It certainly helped that I chose a really thick material, with not too much give, and that the pattern is loose fitting so the seams are tested less.
I definitely like this pattern, its super comfy, and really casual.
Came together well, once I got going.
It is also good as a second layer, almost a jumper, if you use thick fabric.
I feel it's going to get lots of use as the weather is turning cold.

Enough of the airplane impressions.
Verdict:
I love the Named designs, and I hope to sew some of the other pieces, but when I have gained more experience, and have a little more time.
I'll also sew this again, and fancy trying it in a thiner fabric to see how that works.
It was fun to try something new, and thanks to Stephanie again, for having such a cunning plan.


